Powered by Blogger.
RSS

Windows XP Shortcuts Keys


Earlier this month i wrote about microsoft office shortcuts.Here some of the windows shortcuts are listed here.
General keyboard shortcuts
* CTRL+C (Copy)
* CTRL+X (Cut)
* CTRL+V (Paste)
* CTRL+Z (Undo)
* DELETE (Delete)
* SHIFT+DELETE (Delete the selected item permanently without placing the item in the Recycle Bin)
* CTRL while dragging an item (Copy the selected item)
* CTRL+SHIFT while dragging an item (Create a shortcut to the selected item)
* F2 key (Rename the selected item)
* CTRL+RIGHT ARROW (Move the insertion point to the beginning of the next word)
* CTRL+LEFT ARROW (Move the insertion point to the beginning of the previous word)
* CTRL+DOWN ARROW (Move the insertion point to the beginning of the next paragraph)
* CTRL+UP ARROW (Move the insertion point to the beginning of the previous paragraph)
* CTRL+SHIFT with any of the arrow keys (Highlight a block of text)
* SHIFT with any of the arrow keys (Select more than one item in a window or on the desktop, or select text in a document)
* CTRL+A (Select all)
* F3 key (Search for a file or a folder)
* ALT+ENTER (View the properties for the selected item)
* ALT+F4 (Close the active item, or quit the active program)
* ALT+ENTER (Display the properties of the selected object)
* ALT+SPACEBAR (Open the shortcut menu for the active window)
* CTRL+F4 (Close the active document in programs that enable you to have multiple documents open simultaneously)
* ALT+TAB (Switch between the open items)
* ALT+ESC (Cycle through items in the order that they had been opened)
* F6 key (Cycle through the screen elements in a window or on the desktop)
* F4 key (Display the Address bar list in My Computer or Windows Explorer)
* SHIFT+F10 (Display the shortcut menu for the selected item)
* ALT+SPACEBAR (Display the System menu for the active window)
* CTRL+ESC (Display the Start menu)
* ALT+Underlined letter in a menu name (Display the corresponding menu)
* Underlined letter in a command name on an open menu (Perform the corresponding command)
* F10 key (Activate the menu bar in the active program)
* RIGHT ARROW (Open the next menu to the right, or open a submenu)
* LEFT ARROW (Open the next menu to the left, or close a submenu)
* F5 key (Update the active window)
* BACKSPACE (View the folder one level up in My Computer or Windows Explorer)
* ESC (Cancel the current task)
* SHIFT when you insert a CD-ROM into the CD-ROM drive (Prevent the CD-ROM from automatically playing)
* CTRL+SHIFT+ESC (Open Task Manager)
Dialog box keyboard shortcuts
If you press SHIFT+F8 in extended selection list boxes, you enable extended selection mode. In this mode, you can use an arrow key to move a cursor without changing the selection. You can press CTRL+SPACEBAR or SHIFT+SPACEBAR to adjust the selection. To cancel extended selection mode, press SHIFT+F8 again. Extended selection mode cancels itself when you move the focus to another control.
* CTRL+TAB (Move forward through the tabs)
* CTRL+SHIFT+TAB (Move backward through the tabs)
* TAB (Move forward through the options)
* SHIFT+TAB (Move backward through the options)
* ALT+Underlined letter (Perform the corresponding command or select the corresponding option)
* ENTER (Perform the command for the active option or button)
* SPACEBAR (Select or clear the check box if the active option is a check box)
* Arrow keys (Select a button if the active option is a group of option buttons)
* F1 key (Display Help)
* F4 key (Display the items in the active list)
* BACKSPACE (Open a folder one level up if a folder is selected in the Save As or Open dialog box)
Microsoft natural keyboard shortcuts
* Windows Logo (Display or hide the Start menu)
* Windows Logo+BREAK (Display the System Properties dialog box)
* Windows Logo+D (Display the desktop)
* Windows Logo+M (Minimize all of the windows)
* Windows Logo+SHIFT+M (Restore the minimized windows)
* Windows Logo+E (Open My Computer)
* Windows Logo+F (Search for a file or a folder)
* CTRL+Windows Logo+F (Search for computers)
* Windows Logo+F1 (Display Windows Help)
* Windows Logo+ L (Lock the keyboard)
* Windows Logo+R (Open the Run dialog box)
* Windows Logo+U (Open Utility Manager)
Accessibility keyboard shortcuts
* Right SHIFT for eight seconds (Switch FilterKeys either on or off)
* Left ALT+left SHIFT+PRINT SCREEN (Switch High Contrast either on or off)
* Left ALT+left SHIFT+NUM LOCK (Switch the MouseKeys either on or off)
* SHIFT five times (Switch the StickyKeys either on or off)
* NUM LOCK for five seconds (Switch the ToggleKeys either on or off)
* Windows Logo +U (Open Utility Manager)
Windows Explorer keyboard shortcuts
* END (Display the bottom of the active window)
* HOME (Display the top of the active window)
* NUM LOCK+Asterisk sign (*) (Display all of the subfolders that are under the selected folder)
* NUM LOCK+Plus sign (+) (Display the contents of the selected folder)
* NUM LOCK+Minus sign (-) (Collapse the selected folder)
* LEFT ARROW (Collapse the current selection if it is expanded, or select the parent folder)
* RIGHT ARROW (Display the current selection if it is collapsed, or select the first subfolder)
Shortcut keys for Character Map
After you double-click a character on the grid of characters, you can move through the grid by using the keyboard shortcuts:
* RIGHT ARROW (Move to the right or to the beginning of the next line)
* LEFT ARROW (Move to the left or to the end of the previous line)
* UP ARROW (Move up one row)
* DOWN ARROW (Move down one row)
* PAGE UP (Move up one screen at a time)
* PAGE DOWN (Move down one screen at a time)
* HOME (Move to the beginning of the line)
* END (Move to the end of the line)
* CTRL+HOME (Move to the first character)
* CTRL+END (Move to the last character)
* SPACEBAR (Switch between Enlarged and Normal mode when a character is selected)
Microsoft Management Console (MMC) main window keyboard shortcuts
* CTRL+O (Open a saved console)
* CTRL+N (Open a new console)
* CTRL+S (Save the open console)
* CTRL+M (Add or remove a console item)
* CTRL+W (Open a new window)
* F5 key (Update the content of all console windows)
* ALT+SPACEBAR (Display the MMC window menu)
* ALT+F4 (Close the console)
* ALT+A (Display the Action menu)
* ALT+V (Display the View menu)
* ALT+F (Display the File menu)
* ALT+O (Display the Favorites menu)
MMC console window keyboard shortcuts
* CTRL+P (Print the current page or active pane)
* ALT+Minus sign (-) (Display the window menu for the active console window)
* SHIFT+F10 (Display the Action shortcut menu for the selected item)
* F1 key (Open the Help topic, if any, for the selected item)
* F5 key (Update the content of all console wind
ows)
* CTRL+F10 (Maximize the active console window)
* CTRL+F5 (Restore the active console window)
* ALT+ENTER (Display the Properties dialog box, if any, for the selected item)
* F2 key (Rename the selected item)
* CTRL+F4 (Close the active console window. When a console has only one console window, this shortcut closes the console)
Remote desktop connection navigation
* CTRL+ALT+END (Open the Microsoft Windows NT Security dialog box)
* ALT+PAGE UP (Switch between programs from left to right)
* ALT+PAGE DOWN (Switch between programs from right to left)
* ALT+INSERT (Cycle through the programs in most recently used order)
* ALT+HOME (Display the Start menu)
* CTRL+ALT+BREAK (Switch the client computer between a window and a full screen)
* ALT+DELETE (Display the Windows menu)
* CTRL+ALT+Minus sign (-) (Place a snapshot of the entire client window area on the Terminal server clipboard and provide the same functionality as pressing ALT+PRINT SCREEN on a local computer.)
* CTRL+ALT+Plus sign (+) (Place a snapshot of the active window in the client on the Terminal server clipboard and provide the same functionality as pressing PRINT SCREEN on a local computer.)
Microsoft Internet Explorer navigation
* CTRL+B (Open the Organize Favorites dialog box)
* CTRL+E (Open the Search bar)
* CTRL+F (Start the Find utility)
* CTRL+H (Open the History bar)
* CTRL+I (Open the Favorites bar)
* CTRL+L (Open the Open dialog box)
* CTRL+N (Start another instance of the browser with the same Web address)
* CTRL+O (Open the Open dialog box, the same as CTRL+L)
* CTRL+P (Open the Print dialog box)
* CTRL+R (Update the current Web page)
* CTRL+W (Close the current window)

  • Digg
  • Del.icio.us
  • StumbleUpon
  • Reddit
  • RSS

POP3 Access For Free hotmail Users Worldwide


Few weeks backs hotmail enable POP3 access available to users in few selected countries. Now as per latest information available on Live mail blog, POP3 access is now made available to users worldwide.
When you set up Hotmail in the e-mail program on your PC or mobile device, you may be asked for the following information:
POP server: pop3.live.com (Port 995)  
POP SSL required? Yes
User name: Your Windows Live ID, for example yourname@hotmail.com
Password: The password you usually use to sign in to Hotmail or Windows Live
SMTP server: smtp.live.com (Port 25 or 587)  
Authentication required? Yes (this matches your POP username and password)
TLS/SSL required? Yes
In addition to POP3, Microsoft offers additional technologies that
can provide you with an even richer experience of your e-mail. Try
viewing your Hotmail using Windows Live Mail, Microsoft Office Outlook via the Outlook Connector, or Windows Live for Windows Mobile phone.
For those of you, who dont know what POP3 i am talking about, POP3 is a protocol using which you can access your webmail like hotmail or yahoo on your Desktop email clients like Outlook express , Thunderbird  or Outlook.

  • Digg
  • Del.icio.us
  • StumbleUpon
  • Reddit
  • RSS

How To Enable Administrator Account Windows 7


Some of you may be wondering that  many posts from me these days are covering Windows 7 features and tricks. The reason being that more people are interested to know about it and its different features. This curiosity will keep growing till Windows 7 is out officially on oct. 22.
So many of my posts will try to cover Windows 7 for some more time. Today i will be talking about how to enable Administrator account in Windows 7. Administrator account is not enabled by default by Microsoft in Windows 7. Most of you wont even need it anytime.
Administrator account can be enabled very easily by following these steps.
1. Click on Start button and then right click on Computer. Click on “Manage”.
Windows 7 manage
2. In the “Computer Management” Window that appears, browse to “Local user Groups  >> users”
Windows 7 administrator
3. After this right click on Administrator and Click Properties.
Windows 7 administrator1
4.  In the properties Windows , untick “Account is disabled” and click apply.
Windows 7 administrator enable
5. That’s it. Your Administrator account is now enabled. When you log off after this, you will find “administrator” account along with your regular account.
Windows7Ultimate
Hope this trick helps you to play more with Windows 7. Please ask me here if you want me to write about anything related to Windows 7. I will try to write about what you people need.

  • Digg
  • Del.icio.us
  • StumbleUpon
  • Reddit
  • RSS

How To Recover Text From Corrupt MS Office And Open Office Files

Recover Text From Corrupt MS Office And Open Office Files

How often we end up losing data while working with MS Office and Open Office when they get corrupted in between work when something crashes or something odd happens corrupting the files you are working on. If you are lucky, you get the file back recovered by auto save feature of MS Office and Open Office . Often, we would like at least get the text if not the whole file. Corrupt office2txt is such a application which can help in that.
Developers Description
Corrupt office2txt is a small utility designed to enable you to extract the text even from damaged or corrupted Microsoft Office and Open Office files 2.X and 3.X files. It can process files with the extensions .doc, docx, xls, xlsx, ppt, pptx, odt, ods and odp as well as possibly the template and macro variants of these extensions such as dot, xlt and pps if they are changed to the correct corresponding extensions mentioned.
It may succeed at doing so where MS Office Open Office itself fails to salvage text. It can also attempt to recover formatting in the form of a full Open Office file with a regular, odt, ods or odp extension. At this time unfortunately there is no facility for recovering anything but basic formatting for MS Office files through the previously mentioned text extractions. This program can be used as a viewer of text within healthy MS Office and Open Office files without having Open Office installed.
Its a nice free tool which can be helpful in critical situation. Its standalone application which u can store in a folder or carry in your portable drive. Give it a try and share your feedback.
Download Corrupt office2txt.

 http://www.softpedia.com/get/Office-tools/Other-Office-Tools/Corrupt-office2txt.shtml

  • Digg
  • Del.icio.us
  • StumbleUpon
  • Reddit
  • RSS

How to Enable Quick Launch in Windows 7 Windows XP

Enable Quick Launch in Windows 7 Windows XP

I have been a big supporter of Windows XP and I was never able to switch to Windows Vista due to various reasons. It is like I almost hate Vista. Many of the simple features you have in XP can be found missing in new Windows 7 and you would like to have them even in Windows 7.
One of these features is Quick Launch feature in the taskbar. Its not available directly in Windows 7. You need to enable it with some trick. Here we will talk about how to enable it in Windows 7.
1. Just right click on taskbar, and unlock the toolbar. After that , right click again on taskbar and then click new toolbar.
Quick Launch Windows 7 1 300x156 How to Enable Quick Launch in Windows 7 as in Windows XP2. When you click new toolbar as above, type “ %userprofile%AppDataRoamingMicrosoftInternet ExplorerQuick Launch ” in the browser location without the quotes.
Quick Launch Windows 7 2 300x228 How to Enable Quick Launch in Windows 7 as in Windows XP3.  After u click select folder, you will find a quick launch kind of thing on your taskbar at the extreme right side.
Quick Launch Windows 7 3 How to Enable Quick Launch in Windows 7 as in Windows XP4. Now you need to drag the separator bar near start button to other side of quick launch.
Quick Launch Windows 7 4 How to Enable Quick Launch in Windows 7 as in Windows XP5. After this you will find quick launch near your Start button but with text and title  of Quick launch. Just right click on the task bar around quick launch and deselect “show title” and “show text”.
Quick Launch Windows 7 5 291x300 How to Enable Quick Launch in Windows 7 as in Windows XPThat’s all. Now you will have Quick Launch on your Windows 7 as you had in Windows XP

  • Digg
  • Del.icio.us
  • StumbleUpon
  • Reddit
  • RSS

How To Speed Up Shutdown Time Windows 7


Many of you may have already have your hands on Windows 7 and must be exploring it. For those of you who want the shutdown time to be much faster than what it is now, here is a simple registry tweak to make it faster.
Here’s how you can do it.
1. Click on Start and type regedit in search box. Just click on regedit which comes out as search result at top.
Windows 7 Fast Shutdown 238x300 How to speed up shutdown time in windows 72. In the regedit, browse to the following Location:
HKEY_LOCAL_MACHINESYSTEMCurrentControlSetControl
3. In the right pane, right click on WaitToKillServiceTimeout and click on Modify.
Windows 7 Fast Shutdown1 300x217 How to speed up shutdown time in windows 7 4. Type in a number between 2000-20000 (2-20 seconds) , The lesser number you type, more faster will be shutdown. The default value is 12000. Click on OK.
Windows 7 Fast Shutdown2 300x135 How to speed up shutdown time in windows 7
5. Now Close regedit.
6. Restart your PC and you are done. This must help you improve Windows 7 shutdown time by few seconds.

  • Digg
  • Del.icio.us
  • StumbleUpon
  • Reddit
  • RSS

How To Enable Auto Login Windows 7


Many of you including me doesnt like to enter password each time we start our system. For me, I am too lazy to enter passwords when windows start and i have to enter password associated with Windows user ID to log in.
In windows 7 also, you need to enter password each time you start your windows. For lazy guys like me, a automatic login into Windows every time with password being entered automatically when its started is a good option to have. Here’s how you can enable auto login to Windows 7 , without leaving it unprotected without any password.
1. Click on Windows Start button and type “Run” in search box. You will Run program at the top. Click on Run at top.
Windows 7 Run 259x300 How to enable Auto Login in Windows 72. In the ” Run” Window type this command ” Control userpasswords2 ” without the quotes and click OK.
Windows 7 Password auto 300x152 How to enable Auto Login in Windows 73. After this, a window called ” User Accounts”. Now, Untick the option of ” users must enter a user name and password to use this computer” and then click apply.
Windows 7 Password auto1 276x300 How to enable Auto Login in Windows 74. After you click apply, a window will pop up with user name and password. Just fill this with the password associated with this account and save it.
Windows 7 Password auto2 300x167 How to enable Auto Login in Windows 7That’s all. After doing all this, when you start your system next time then it wont ask for password to log in. It will automatically log in the user account you choose above.

  • Digg
  • Del.icio.us
  • StumbleUpon
  • Reddit
  • RSS

How to resolve Error 0x80071A91


Two days ago when I was trying to create a Restore Point manually, my windows 7 PC welcomed me with the following error message.
Transaction support within the specified file system resource manager is not started or was shutdown due to an error. (0x80071A91)
Since my pc is always used to be in top condition the error was very much unexpected to me,. I tried to search “Microsoft help” but what I got is this “http://support.microsoft.com/kb/927748/en-us”. Microsoft help wasn’t really helpful.
After doing some research and a little bit of Googling I finally found the solution. Actually the “fsutil.exe” tool has an additional argument “resource”, which evidently controls FSRM {file system resource manager} behavior. So resetting the FSRM actually solved the Problem.
So if u see the Error (0x80071A91) on your vista or windows 7 PC then follow the following steps: =
  1. Click the ‘Start Button’ on your Desktop.
  2. Type “cmd” in the search field and open command prompt in Administrator mode {Right Click and select “Run as administrator”}. It you still have UAC enabled, it will ask you for permissions, click “OK”.
  3. Type “fsutil resource setautoreset true C:”  {assuming that you have your OS on drive C }
  4. Reboot your computer.

  • Digg
  • Del.icio.us
  • StumbleUpon
  • Reddit
  • RSS

How to Re Activate Windows 7 for 120 days

Activate Windows 7 for 120 days

Most of you know that Windows 7 RTM is out now though not officially. For those of you who are over enthusiasts and cant wait to test windows 7 must have downloaded Windows 7 RTM from somewhere either from torrents or some warez networks.
As many of you have noticed, you cant use release candidate RC or beta keys to activate Windows 7. You still need to wait till Windows 7 is officially available to public. Till that time you can use it as evaluation copy but just for 30 days.
There is a legal way to activate it for 120 days till public release. It is not a hack, it is a system put in place by Microsoft to give you more time to evaluate it.
1. Open the Start Menu.
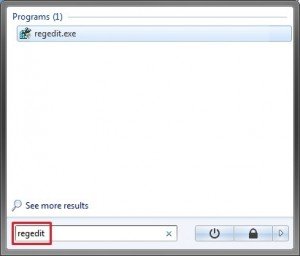
2. In the Start Menu search box, type Regedit and press Enter.
Start Menu 300x256 How to Rearm / Activate Windows 7 for 120 days
3. In the registryEditor, go to:
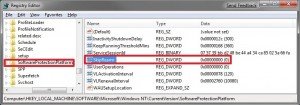
HKEY_LOCAL_MACHINESOFTWAREMicrosoftWindows NTCurrentVersionSoftwareProtectionPlatform . In the right pane, see if SkipRearm is set to 0 (number 0)
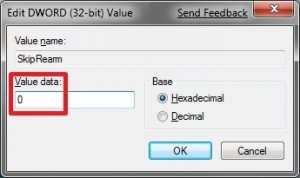
Windows 7 Skip Rearm 300x105 How to Rearm / Activate Windows 7 for 120 days5. If it is not set to 0 – Right click on SkipRearm and click on Modify. Type 0 and click on OK. (See screenshot below).If it is set to 0 – Skip this and go to step 6.
Windows 7 Rearm 300x178 How to Rearm / Activate Windows 7 for 120 days
6. Open a elevated command prompt (it will be elevated if you are Admin, or if not just run it as Admin)
7. In the elevated command prompt, type slmgr -rearm and press Enter. (See screenshot below)
Windows 7 Rearm 1 300x61 How to Rearm / Activate Windows 7 for 120 days
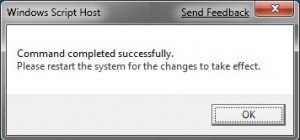
8. If successful you will get the below screenshot. Click on OK.
Windows 7 rearm done 300x140 How to Rearm / Activate Windows 7 for 120 daysYou can rearm to a maximum for 3 times that means a total of 120 days. So evaluate it for maximum before you decide to buy Windows 7. The above procedure i got from a forum and was posted by a user Brink aka Shawn.

  • Digg
  • Del.icio.us
  • StumbleUpon
  • Reddit
  • RSS

Windows 7 and Server 2008 R2 RTM Build 7600 Download

 Windows 7 and Server 2008 Futures

Recently Microsoft has signed off the RTM (Released to Manufacturing) build of Windows 7 and Windows Server 2008 R2 with tag numbers. Internal informations says that this build of Windows 7 RTM is compiled on July 10, 2009, at 19:45 PM. This is being said that Windows 7 RTM will be build 7600 with version number of 6.1.7600.16384 and full build string of 6.1.7600.16384.win7_rtm.090710-1945, if it’s truly the final gold RTM code for Windows 7.
Leaked information and ISO images of Windows 7 RTM Build 7600 are from Chinese sites. They have posted Windows 7 RTM Build 7600 screenshots with official Windows 7 RTM wallpapers.
windows7 rtm properties
windows7 calculator
windows 7 rtm internet explorer
windows 7 rtm setup
According to WZor, the choice for final RTM build for Windows 7 and Windows Server 2008 R2 is between the following candidates before the build jumps to 7600:
6.1.7269.0.win7_rtm.090706-1900;
6.1.7270.0.win7_rtm.090708-1900;
6.1.7271.0.win7_rtm.090709-1520;
Windows 7 Build 7264 is the latest leaked build and is available in 64-bit (x64). Leaked Windows 7 Build 7600 are lables with following ISO details:
US English
32-bit: 7600.16384.090710-1945_x86fre_client_en-us_Retail_Ultimate-GRMCULFRER_EN_DVD.iso
Size: 2,501,750,784
SHA1: 66588F282A88D71A4A1E11BE7C093F02FBFFDDF9
64-bit: 7600.16384.090710-1945_x64fre_client_en-us_Retail_Ultimate-GRMCULXFRER_EN_DVD.iso
Size: 3,224,717,312
SHA1: 0×31849B315290EFABFD81F967ED3C553D82925E4C
Simplified Chinese
x86: 7600.16384.090710-1945_x86fre_client_zh-cn_Retail_Ultimate-GRMCULFRER_CN_DVD.iso
Size: 2,604,361,728
SHA1: E43BC56AE77A4AB4006A93BB392B150D8A73CCF8
x64: 7600.16384.090710-1945_x64fre_client_zh-cn_Retail_Ultimate-GRMCULXFRER_CN_DVD.iso
Size: 3,341,467,648
SHA1: A5D467B9B5244C53FEA7B7BED7550AB35F34AB4E

Download Windows 7 RTM Build 7600

Detailed Description :
File Name: 7600.16384.090710-1945_x64fre_client_en-us_Retail_Ultimate-GRMCULXFRER_EN_DVD.iso
Build Version: 6.1.7600.16384.win7_rtm.090710-1945 or 7600.16384.090710-1945
Size: 3,224,717,312
SHA1: 31849B315290EFABFD81F967ED3C553D82925E4C
CRC32: 1EE7DC6F
MD5: E6CE9644D0C7A8E1C950D257A7B2C8A4
Download Windows 7 RTM Build 2007 Torrent File
http://depositfiles.com/files/ntgrei1qg

Download Windows Server 2008 R2 RTM Build 7600

Detailed Descriptions :
RAR File Name: 7600.16384.amd64fre.win7_rtm.090710-1945.serverenterprise_en-us_vl. serverenterprise.vhd.wzt.rar
RAR Size: 2,182,940,856 Bytes
RAR SHA1: 30559CECBCDB628D0926D1D4A0F77925BAC0C9C6
RAR MD5: 5A8EE7F772482188E9A2149B250B678C).
VHD File Name: 7600.16384.amd64fre.win7_rtm.090710-1945.serverenterprise_en-us_vl. serverenterprise.vhd
VHD Size: 6,857,337,856 Bytes
VHD CRC: 2AA7974F
VHD SHA1: EA13B569AD4EA4F34955D1FB8A7ADFF8A30297E6
VHD MD5: EC65EE9F3B18F7A232F8B0073A02216A
Download Windows 7 Server 2008 R2 RTM Build 7600
http://depositfiles.com/files/78it13wyv

  • Digg
  • Del.icio.us
  • StumbleUpon
  • Reddit
  • RSS

Learn How to Check Windows Version using System Information

Check Windows Version using System Information Edit


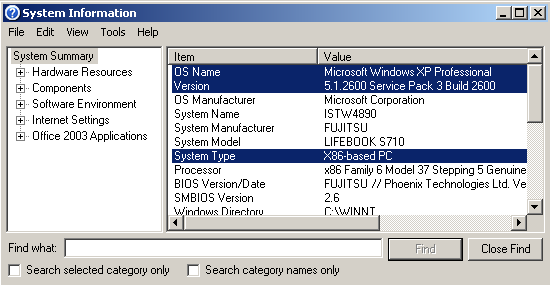
Windows users can use System Information tool to check Windows version numbers, service pack level and the build number they are running on as Windows operating system.

Windows version check using msinfo32 - System Information tool is the easiest way of checking all system related data, parameters, and values.
Here is the steps to determine Windows version using msinfo32 System Information tool.

Click on Start buton.
Windows XP users can type msinfo32 in Run Command screen.
Windowss Vista and Windows 7 users can type msinfo32 in Start Search.
Press Enter

This will display the System Information screen as follows:

check-windows-version-using-msinfo32-windows-xp

  • Digg
  • Del.icio.us
  • StumbleUpon
  • Reddit
  • RSS

ITD ::: Create PPPOE Connection In Windows2000


The first step is to DOWNLOAD RASPPPoE. You can do this with your alternative backup dialup service if you don't have an alternate Internet connection. Use the "Download and install" link on the left, and you'll want to download the version marked "32-bit release for x86 machines". Once you've completed the download, unzip the file into a temporary directory (such as C:\RASPPPoE).
Click "Start" then "Settings" then "Control Panel", then browse to "Network and Dial-Up Connections"

Download Patch:
http://www.raspppoe.com/files/RASPPPOE_098B.ZIP
http://www.raspppoe.com/files/RASPPPOE_098B_3COM.ZIP


Right-click "Local Area Connection" and select "Properties".


In the properties dialogue box, click the "Install" button.


In the "Select Network Component Type" window, select "Protocol" and click the "Add" button.

 
In the "Select Network Protocol" window, click the "Have Disk" button.
In the "Install From Disk" window, either type the name of the temporary directory to which you extracted RasPPPoE, or click the "Browse" button to navigate to it, and then click the "OK" button.
A new window opens, offering the "PPP over Ethernet Protocol" for installation. Click "OK" to start installing the protocol.

 
After the "PPP over Ethernet Protocol" is installed, return to the "Local Area Connection Properties" window and click "Close" to close the window. The protocol is now fully functional, but you still need to create a dialup connection to use it.

 
Click the "Start" button on the taskbar and select "Run" to bring up the "Run" dialogue box. Type raspppoe into the box and click the "OK" button to run the dialup Connection Setup application.

 
A dialogue box appears with a combo box labelled "Query available PPP over Ethernet Services through Adapter" at the top.
Select the network adaptor to which your broadband modem is connected from the list. If the protocol is only operating on one network adapter, the box will be greyed out, as there is no choice to make. Click the "Query Available Services" button. The application will send out a query for offered services and display the result in the list view below.
Click the "Create a Dial-Up Connection" for the selected "Adapter button".

 
Shortly afterwards, a shortcut to the new dialup connection named "Connection through (adaptor name)" should show up on your desktop.

 
Rename the connection icon to iiNet ADSL Connection.

 
To start the connection to the Internet, double-click the "iiNet ADSL Connection" icon. If it's the first time you've started the connection, you'll need to fill in the following fields:
  • Username: Enter your full iiNet username, e.g. john.citizen@iinet.net.au
  • Password: Enter your password as supplied by iiNet
Click the "Dial" button to connect to the Internet.

  • Digg
  • Del.icio.us
  • StumbleUpon
  • Reddit
  • RSS

ITD ::: All you need to know about IP address

All you need to know about IP address

What is IP address?

If you aren't sure what IP address is, IP (Internet Protocol) address is a unique address that identifies a computer or a device on the Internet. It contains 32 bits or 4 bytes (octets) and is written in four sets of decimal numbers separated by a period (or dot) in between. Each set of decimal numbers represents a byte (i.e. 8 bits) and can not exceed 255, that is when all the eight bits are 1 (or 11111111). Example of IP address: 202.60.80.1
An IP address is comparable to a telephone number that uniquely identifies an individual or a business on the telephone network.

==>> The anatomy of IP address

Every computer or device on the Internet is part of a network (e.g. ISP, corporate, or home network). That's why IP address body (i.e. xxx.xxx.xxx.xxx where x is a decimal number) consists of network identity (ID) and host (i.e. node/device) ID. A subnet mask value which resembles an IP address is usually given along with an IP address to help identify which part of the address refers to network ID or host ID. Subnet is logical grouping of hosts in a network that functions to segregate traffic.
In a class A IP address, the first byte refers to network ID and the last three bytes refer to host ID. In a class B IP address, the first two bytes refer to network ID and the last two bytes refer to host ID. In class C IP address, the first three bytes refer to network ID and the last byte refers to host ID. Class A IP addresses are used by very big networks, class B by medium to large networks, while class C by small networks.
  From To Default subnet mask
Class A 0.0.0.0 127.255.255.255 255.0.0.0
Class B 128.0.0.0 191.255.255.255 255.255.0.0
Class C 192.0.0.0 223.255.255.255 255.255.255.0
 Example, if your computer IP address is 192.168.1.3 (a class C IP address), it must belong to a network (LAN) with this network address 192.168.1.0 and its host ID is 3.


What is my IP address?

Your IP address currently is 119.73.71.173
When your computer (be it a desktop PC, laptop/notebook, netbook, tablet, handheld/PDA, or smart phone) accesses the Internet, it has an IP address that is assigned to it by your ISP or a broadband router in your home or company network. IP address is different with MAC address. A MAC address or physical address was assigned to a device by its manufacturer and stays the same during its lifetime while IP address depends on the network or service provider through which your computer or device gets an Internet connection.
For example, if you use Windows XP, to check your IP address, do one of the following:
1) double-click your Internet connection icon on the taskbar and click the Details tab.
2) open the Command Prompt window and type this command : ipconfig or ipconfig /all. You can go to the Command Prompt through Start > All Programs > Accessories > Command Prompt. [To find Command Prompt in Windows Vista or Windows 7, just click Start button and type cmd in the search box and press Enter.]
3) go to Network Connections folder, click on your Internet connection name, and see your IP address on the Details pane on the bottom left of the folder. You can go to the Network Connections folder through Start > Connect To > Show all connections or through Control Panel. [In Windows Vista or Windows 7, right click a connection icon on the taskbar/system tray, select Network and Sharing Center. On the left pane, select Manage network connections to open Network Connections folder. Right click an active connection, select Status, and click Details.]

Dynamic IP address vs. static IP address

When your computer connects to your ISP, your ISP assigns an IP address to it. In the case of dial-up access over telephone line or broadband access (e.g. DSL or cable modem) using PPPoE/PPPoA that requires log-in, your computer will get a different IP address each time it connects to the ISP and makes an Internet connection through it. This address is called dynamic IP address. The IP address is assigned by a DHCP server at your ISP. This this the most common case since every ISP has limited IP addresses stock. On the other hand, using an always-on broadband connection, your computer is usually given the same IP address all the time by the ISP. This address is called static IP address.
Dynamic IP address is assigned to your computer by a broadband router (or residential gateway) if your computer is on a LAN (home or office network) and accesses the Internet through a broadband router. But this address is for internal use only, it gets converted to a public IP address when communicating over the Internet. Dynamic IP address assignment is handled by a DHCP server at the router. The DHCP server can be set to reserve an IP address for a computer during a connection or change it periodically at a predefined interval. The router also handles the network address translation (NAT), i.e. converting private IP address assigned by the DHCP to a public IP address assigned by the ISP.


Private IP address vs. public IP address

Private IP address is only used within a LAN or an internal network (e.g. home or company network), while public IP address is used for communication over the Internet. If your computer is part of a company network, chances are it is assigned a private IP address and when it connects to the Internet the private IP address is translated to a public IP address by a router which has NAT capability. Private IP address is also known as internal IP address, while public IP address is external IP address. LAN IP address is always a private IP address, while WAN IP address can be a private or public IP address. This article clarifies the difference between LAN IP address and WAN IP address.
OK, in case you are wondering, the table below tells you which IP addresses are allocated for use only in internal networks as private IP addresses.
IP address class private IP address range
  From To
Class A 10.0.0.0 10.255.255.255
Class B 172.16.0.0 172.31.255.255
Class C 192.168.0.0 192.168.255.255


What is the function of IP address?

IP addresses are used by devices called routers on the Internet to forward messages from one computer to another over the Internet. In comparison to a telephone network, a router acts like a telephone switch (exchange) that connects a caller to the dialed phone number.
When you send a message over the Internet, the message is broken down into small pieces - called packets - where each packet can take its own route. IP addresses information is included in the packet header. Your computer sends each packet along with your computer (i.e. source) IP address and the receiving computer (i.e. destination) IP address. The routers read the source and the destination IP addresses by examining a packet header and forward the packet accordingly.
However, you usually type a web address (e.g. www.conniq.com) instead of an IP address in your browser's address bar. That's because there are servers on the Internet that store the mapping of web addresses to IP addresses. They are called DNS servers. The DNS servers handle the translation from a web address to an IP address. A DNS server is analogous to a telephone directory that contains a list of telephone numbers and businesses or individuals who own the numbers.


==>> How many routers do forward my message before arriving at a specific web address?

Your message does not get to the destination address via one router. There are many routers involved in forwarding your message to the destination computer (i.e. in this case, a web server). You can do little investigation by typing tracert ip_address or tracert web_address in Command Prompt. Replace the ip_address or web_address part after tracert with your destination, e.g. www.myexampledestination.com. This command will trace the routes that take your message to its destination by sending ICMP messages. Some routers have been set not to accept an ICMP message from the Internet therefore you won't get a reply. But since many allow it, by reading the result you would be amazed at how far your message can travel in milliseconds and how many hops it makes to get to its destination.


How will the website I visit use my IP address?

Your IP address can be used for location targeting that is identifying where you come from and presenting you relevant content tied to your geographic location. That's because IP addresses in bulk are allocated to regions and countries around the world by the IANA in a delegated manner through several Regional Internet Registries. And each ISP obtains IP addresses for its subscribers from Local or National Internet Registry.
Nonetheless, a website you visit can not know who you are, solely from your IP address. Unless you register to the website and gives it your personal information, you will remain anonymous.


  • Digg
  • Del.icio.us
  • StumbleUpon
  • Reddit
  • RSS

ITD ::: WiMAX in a Wi-Fi Mesh Network

WiMAX in a Wi-Fi Mesh Network

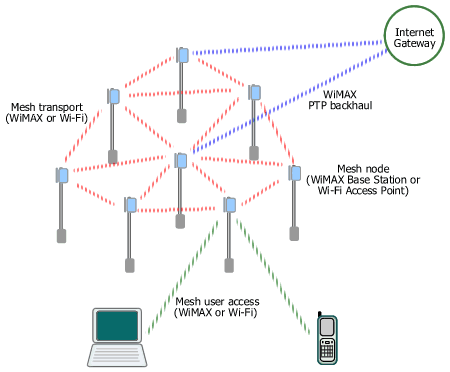
Mesh topology is not supported by existing IEEE's wireless LAN standards but it becomes popular as city-wide (municipal) Wi-Fi network deployment gains more supporters day after day. In a mesh network, each node (i.e. base station or access point) connects to several neighboring nodes and on to a mesh gateway (i.e. a base station that aggregates the mesh network traffic and routes it to the Internet). Since each node has many routes to a mesh gateway, mesh network is very reliable. But mesh network is more complex to manage and poses interference challenge especially for operation in a license-exempt band such as in Wi-Fi case.
WiMAX access, transport, and backhaul in a municipal Wi-Fi mesh network
Figure. Mesh Network with Wi-Fi and/or WiMAX
WiMAX can work on all layers of a municipal mesh network (hotzone/metro zone).
By examining current Wi-Fi mesh network architecture, basically there are three layers. These are mesh access handling user access to a mesh node, mesh transport interconnecting mesh nodes and routing traffic to mesh gateways, and backhaul connecting a mesh gateway to an Internet PoP (Point of Presence) or other content gateways.
Backhauls for mesh Wi-Fi networks are provided using various wired and wireless solutions, i.e. fiber optic, leased line, DSL, and proprietary point-to-point (PTP) or point-to-multipoint (PMP) radio including some pre-WiMAX equipment. A wireless backhaul - specifically WiMAX - enables flexible placement of a mesh gateway node anywhere in the network, therefore it doesn't have to be located in a telco's CO or close to a fiber/DSL termination point. The portable WiMAX equipment (Base Station) also allows fast installation and easy relocation. Moreover, WiMAX was designed for outstanding performance in NLOS environment, typical in metro area with many high rise buildings. WiMAX also can operate either on licensed or unlicensed band, giving more options for operator/ISP/municipality in addressing various interference conditions and users' requirements.
The mesh transport layer provides the interconnection between mesh nodes. There is a project in the IEEE to standardize Wi-Fi as an intra-mesh transport solution, but the work is still in progress. The current established Wi-Fi solution uses proprietary technology developed by each vendor which might cause interoperability issues in the future. WiMAX can naturally replace Wi-Fi in this layer, interconnecting mesh nodes using standard equipment based on the IEEE 802.16-2004 or 802.16e which includes support for optional mesh topology. Besides, WiMAX has built-in QoS support and is optimized for longer distance (WiMAX is a wireless MAN while Wi-Fi is a wireless LAN) .
For mesh access layer, at present users connect using their Wi-Fi-enabled laptops, PDAs, or smart phones. WiMAX integration into such portable/mobile devices is still in its early stage of development. However, in several months/years to come one may expect the emergence of dual-mode Wi-Fi/WiMAX devices and network adapters (NIC, PC card, PCI Express) which can connect automatically to any available network with the best signal.

  • Digg
  • Del.icio.us
  • StumbleUpon
  • Reddit
  • RSS

ITD ::: Fiber Optic Multiplexer -Mux 8 To 16 Port VDC And VAC

Fiber Optic Multiplexer 8 or 16 ports
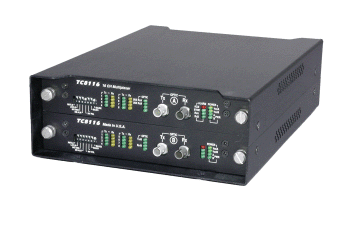
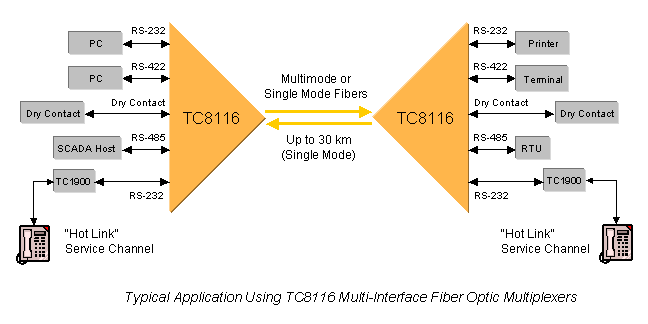
The TC8116 is an 8 or 16-channel fiber optic multiplexer with interchangeable interfaces and built-in power redundancy. Standard interfaces include RS-232, RS-422, TTL, RS-485 & Dry Contact Closure.  Electrical interfaces are modular and interchangeable in 4-channel increments at any time--before or after installation.  Because different interfaces can be mixed in 4-Channel increments, a wide variety of interface combinations are available

8/16 Channel Multi-Interface 
(Model TC8116)    Related Products:  TC8108


  • Mix or Match Field-Interchangeable Interfaces: RS-232, RS422, RS-485, TTL, & Dry contact Relays
  • Data Rates up to 56 Kbps*
  • 8 or 16 Channels
  • Built-In Power Redundancy
  • Optional Optical Redundancy
  • Local Dry Contact Relay
  • Built-In Test Signal Generator
  • Local & Remote Loopback Features
  • Multimode or Single Mode (850/1300/1550nm)
  • Rackmount or Standalone
  • Extend telephone lines with TC1900 RS-232/Fiber Phone Extenders
  • Dimensions: Chassis Style SD10
 

Applications

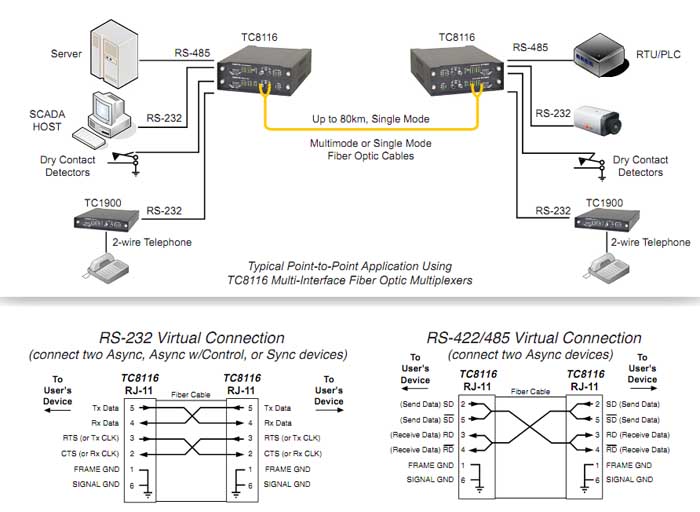
The TC8116 Fiber Optic Multiplexer provides a flexible, inexpensive method for connecting async/sync terminals, printers, and status collecting devices.  It is often used in harsh environments where EMI/RFI interference, ground loops and lightning conditions may exist.  The TC8116 can also be used to extend telephone lines to remote locations with the Model TC1900 RS-232/Fiber Phone Extenders.

Description

The TC8116 is an 8 or 16-channel fiber optic multiplexer with interchangeable interfaces and built-in power redundancy. Optical redundancy is optional. It supports data rates up to 56Kbps*. The TC8116 is available in four configurations:
  • 8 Channel Async Multiplexer
  • 8 Channel Sync/Async Multiplexer
  • 16 Channel Async Multiplexer
  • 16 Channel Sync/Async Multiplexer


Standard interfaces include RS-232, RS-422, TTL, RS-485 & Dry Contact Closure.  Synchronous versions must be RS-232.  Electrical interfaces are modular and interchangeable in 4-channel increments at any time--before or after installation.  Because different interfaces can be mixed in 4-Channel increments, a wide variety of interface combinations are available.


Diagnostics are extensive and include DIP switches for Local & Remote Loopback, a Test Signal Generator, an Electrical Signal Polarity Inverter, and other application configuration switches.  Each unit also provides multiple LEDs for Alarm, Power, Vcc, Optic Signal Status, and Tx & Rx LEDs for each channel.  The built-in test signal generator verifies both device and fiber optic link operation.  This feature benefits users by helping technicians verify that both local & remote devices and the fiber optic link are operating normally.  No other test equipment is required for link and device verification.
The TC8116 is compatible with all types and sizes of multimode (850/1300nm) or single mode (1300/1550nm) fiber optic cable.  Fiber optic connectors are ST or FC.  Electrical connectors are RJ-11.  Power is 12VDC (standard) or 24VDC, -48VDC, or 115/230VAC with an external power cube.  An extreme temperature version (-20o to 70oC), Model TC8116T, is also available.

Specifications
Data Rates (per channel)
 
 ....................................to 38.4 Kbps
Channel Capacity
  
Async..................................8 or 16
   Sync (RS-232 only)..............8 or 16
Optical 
   Transmitter....................LED/ELED
   Receiver........................PIN Diode
   Wavelength
    ...........................850/1300nm MM
    .........................1300/1550nm SM
   Fiber Optic Connectors
   ........................... ST, FC Optional
   Loss Budget* -850/1300/1550nm
   Multimode @ 62.5/125µm........15dB
   Single Mode @ 9/125µm.........15dB
 Visual Indicators  System
   
Channel Status (each channel).....
   Tx, Rx, System, Power A, Power B
   VccA VccB, ALARM
   Optic SYNC. RxA, RxB, USE RxA,
   USE RxB, OPTIC, RxB
System
  
Bit Error Rate.........1 in 109 or better
Electrical
   
Connector..................RJ11 Female
   Interface...........(standard)  RS-232,
   ........... RS-422,  Dry Contact Relay
   Interface (custom)  TTL, 2 or 4-wire
   ...............RS-485* or a combination
Alarm

   Dry Contact Normal................OPEN
Power
  
Standard............12VDC @ 400mA
   Optional............................24VDC,
    ............. -48VDC, or 115/230 VAC
    with external power cube
Temperature
  
Operating....................-10° to 50°C
   Hi-Temp (optional)........-20° to 70°C
   Storage ......................-40° to 90°C
   Humidity.........95% non-condensing
Physical (Rackmount Card)
  
Height.........................(3.53cm) 1.4"
   Width.......................(18.10 cm) 7.1"
   Depth.......................(24.80 cm) 9.8"
   Weight.......................(280gm) 8 oz.
*Contact factory for higher requirements (Laser)

  • Digg
  • Del.icio.us
  • StumbleUpon
  • Reddit
  • RSS

ITD ::: BlueTree GSM-GPRS Cell Cellular Modem with GPS

BlueTree GSM-GPRS 
Cell Cellular Modem with GPS
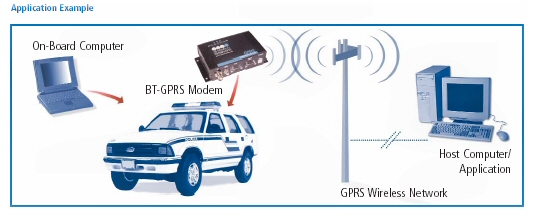
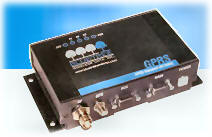
The BT-2010 GSM GPRS cell modem is designed to military (MIL) and automotive (SAE) specifications for ruggedness in harsh environments, including temperature, humidity, vibration and shock. Integrated mounting feet make it suitable for mounting in a vehicle or other harsh environments
  • BT-2010 GPRS Standard GSM Cellular Modem with GPS
  • RUGGED - RELIABLE - HIGH PERFORMANCE

  • Rugged Design
  • Dual-Band GPRS 850Mhz and 1,900Mhz
  • High-Speed Data
  • Maximum Power and Coverage
  • Standard Communications Protocols
  • Modem Management Software - BlueVue
  • Proven Reliable RF Module
  • GPS
The BT-2010 modem is designed to military (MIL) and automotive (SAE) specifications for ruggedness in harsh environments, including temperature, humidity, vibration and shock. Integrated mounting feet make it suitable for mounting in a vehicle or other harsh environments
The BT-20x0 modem supports both North American GPRS frequencies, including 850 MHz and 1,900 Mhz.
The BT-2010 supports GPRS Class 8, meaning it provides the highest  possible throughput available on GPRS networks (up to 56 kbps).
The BT-2010 modem uses a full power transceiver and high-efficiency screw-on antenna connector. Users benefit from optimum signal strength and coverage.
The BT-2010 modem supports: GPRS packet data connections CSD circuit-switched (dial-up) data connections Serial RS-232 (or optional USB adapter)
Communications protocols: AT commands and PPP
BlueVue modem management software provides a Windows™-based graphical interface that allows you to: Program the modem Monitor status of connections Initiate connections/data sessions View diagnostic info, such as signal strength, and network status GPS - display and redirection
The BT-2010 uses the RIM1902G GPRS RF module. The result is the ultimate in reliability from the industry leaders in GPRS technology.
The BT-2010 provides standard GPS. The modem incorporates an internal Trimble Lassen SQ GPS module and supports standard TSIP, TAIP and NMEA 0183 protocols. The GPS information is available on the secondary serial port.
Customers benefit from the support of our Value-Added Resellers and from the knowledge of BlueTree's development team. Our 1-year warranty is included, plus optional 3-year extended warranty for total protection.
BlueTree focuses exclusively on wireless modems for mobile and industrial applications. The BT-series modem provides all the ruggedness you need without additional features you don't.

APPLICATION EXAMPLES
  • Police, Fire, EMS and other Emergency Services
  • Public Transit and Transportation
  • Vehicle Tracking - AVL
  • Field Service & Mobile
  • Dispatch
  • Utility Automatic Meter
  • Reading (AMR)
  • Automated machine-to-machine
  • (M2M)
  • Telemetry and SCADA

  • Digg
  • Del.icio.us
  • StumbleUpon
  • Reddit
  • RSS

ITD ::: Flexpoint 100FF 100FX/100TX Single-Mode To Multimode or Multimode To Single-Mode Fiber Coverters

100FX Single-Mode to Multimode
Fiber converter


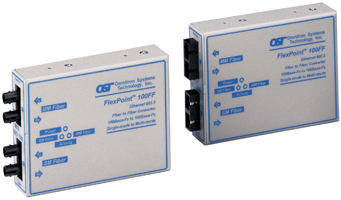
The FlexPoint 100FF Single-Mode to Multimode Fiber Converter supports Ethernet and Fast Ethernet and Token Ring.

Flexpoint 100FF

Single-Mode to Multimode or
Multimode to Single-Mode
Fiber Converters
for 100FX -100TX Fast Ethernet
FlexPoint 100FF
The FlexPoint 100FF Single-Mode to Multimode Fiber Converter supports Ethernet and Fast Ethernet and Token Ring. Capable of extending network distances up to 58 km (36 mi.) over single-mode fiber.
Available with SC and ST connectors in a variety of both multimode and single-mode fiber combinations.
Operates in half duplex or full duplex.
Supports 10Base-FL, 100Base-Fx and IEEE 802.3 specifications.
Wall-mountable or rack-mountable on a 5-unit shelf or in the 14 unit power-redundant FlexPoint Powered Chassis.
Out-of-the-box plug-and-play operation.
Software-independent.
Lifetime warranty.

The FlexPoint 100FF Single-Mode to Multimode Fiber Converter is a member of the modular FlexPoint product line. The FlexPoint product line supports the IEEE 802.3 standard and provides an extensive range of connectivity options across different media types.
The FlexPoint 100FF Single-Mode to Multimode Fiber Converter provides a cost-effective solution to extend network distances by connecting multimode fiber networks or devices over single-mode fiber cabling.
The FlexPoint 100FF provides diagnostic data through LED indicators that assist in network installation and maintenance. The LEDs report the availability of power and the detection of devices attached to the fiber ports.
The FlexPoint 100FF offers several mounting options. It can be mounted stand-alone utilizing optional wall-mounting hardware. It can also be rack-mounted using a 5-unit rack-mounting shelf or be installed in a rack-mountable, high-density, 14-unit, power-redundant chassis.

Specifications
FlexPoint 100 FF 
Connectors and Cables:  
Fiber:
SC or ST
Multimode:
50/125, 62.5/125, 100/140 µm
Single-Mode:
9/125 µm
Supported Distances:  
Ethernet and Token Ring:
 
Multimode:
5 km/16,400 ft.
Single-Mode:
20 km/66,000 ft.
Fast Ethernet:
Half-Duplex Full-Duplex
MM/Sx, 850 nm:
412 m/1,350 ft. 500 m/1,640 ft.
MM/Lx, 1300 nm:
412 m/1,350 ft. 5 km/3.1 mi.
SM/Lx, 1300 nm:
412 m/1,350 ft. 28 km/16.8 mi.
SM/Lx/LH, 1300 nm:
412 m/1,350 ft. 58 km/36 mi.
Indicators:  
Power:
LED, Yellow, power applied
Fiber Link/ Receive:
LED, Green, Link/ data received
Dimensions/Weight: W:3.0"xD:4.0"xH:1.0"/ 6 oz.
Power: 9 VDC/500 mA or 5 VDC/750 mA
Physical/ Environmental:  
Temperature: Operating: 0 to 70 degrees C
  Storage:: -40 to 80 degrees C
Humidity:
0-90% (non-condensing)

Ordering Info
DC power the X will be 0
as in 4411-0
115VAC power the X will be 1
as in 4411-1
220VAC power the X will be 2
as in 4411-2
Model
Port 1
Port 2
Media Type
Distance
Media Type
Distance
4411-x
MM/SC/Lx 1310 nm
5 km
SM/SC/Lx 1310 nm
28 km
4412-x
MM/ST/Lx 1310 nm
5 km
SM/ST/Lx/LH 1310 nm
58 km
4413-x
MM/SC/Lx 1310 nm
5 km
SM/SC/Lx/LH 1310 nm
58 km
4410-x
MM/ST/Lx 1310 nm
5 km
SM/ST/Lx 1310 nm
28 km
4414-x
MM/ST/Sx 850 nm
500 m
SM/ST/Lx 1310 nm
28 km
4415-x
MM/SC/Sx 850 nm
500 m
SM/SC/Lx 1310 nm
28 km
4416-x
MM/ST/Sx 850 nm
500 m
SM/ST/Lx/LH 1310 nm
58 km
4417-x
MM/SC/Sx 850 nm
500 m
SM/SC/Lx/LH 1310 nm
58 km
4418-x
MM/ST/Sx 850 nm
500 m
MM/ST/Lx 1310 nm
5 km
4419-x
MM/SC/Sx 850 nm
500 m
MM/SC/Lx 1310 nm
5 km
4420-x
MM/ST 1310 nm
5 km
MM/ST 1310 nm
5 km
4421-x
MM/SC 1310 nm
5 km
MM/SC 1310 nm
5 km

  • Digg
  • Del.icio.us
  • StumbleUpon
  • Reddit
  • RSS
Design Downloaded from Free Blogger Templates | Free Website Templates
Free Blogger Templates Free Joomla TemplatesFree Blogger TemplatesFree Website TemplatesFree Wordpress Themes TemplatesFree CSS TemplatesFree Wordpress ThemesFree CSS Templates dreamweaver